Why should you be interested in this? Well, how would you like to be able to grow your own food year-round that’s far cheaper and healthier than what you could buy in the store? If you think it’s worth a shot learning, then please continue reading.
What is hydroponics exactly? It basically is the discovery that plants can grow without soil. All a plant needs is certain nutrients, water, and sunlight. Francis Bacon actually made the first recorded attempt to work on growing terrestrial plants (plants that normally require soil) without soil in 1627. This method is being adapted around the world for food production for the following reasons:
1. No soil is needed (ideal for places where in-ground agriculture or gardening are not possible)
2. The water stays in the system and can be reused (saves money on water)
3. It is possible to control the nutrition levels and use less (saves money on nutrients)
4. No nutrition pollution is released into the environment because it’s a controlled system
5. Stable method which yields high results
6. Pests and diseases are easier to get rid of than in soil, due to the container’s mobility
7. It is easier to harvest, since you can grow any plant year-round
8. No pesticide damage
The biggest disadvantage is that without soil as a buffer, any failure to the hydroponic system will lead to rapid plant death. Also, fungus and mold may grow on the plants if certain soil based plants are over watered. Also, depending on the plant you’re trying to grow it may require different fertilizers and containment systems than others. And yet, the possibility of success with this system is still far greater than failure, which is why I recommend everyone to at least give this a try. The following is the list of items needed:
1. 5 or 4 gallon bucket with lid (either old paint or cat litter buckets will be fine) (must cut holes into the lid so the net pots sit nicely inside)
2. Net pots (3.75” in diameter, good size for peppers and tomatoes) (about $1 a piece on eBay and 4 will fit in each bucket)(only needs to have 1” contact with water to give an idea of how high the bucket needs to be filled up)
3. Aquarium air stone (fancy name for clear tubing about 12” long) (about $4 a piece on eBay)
4. Air pump (about $15 on eBay, which typically comes with two external ports for the aquarium air stones to attach to, which is why I recommend two buckets for a single system)
5. Fertilizer that includes micro-nutrients
6. Water
7. Plants (gently wash off the roots so there is no soil, and place in net pots with peat gravel)
When choosing a container for the system, plastic is most commonly used, but other materials such as: concrete, metal, vegetable solids and wood are also possible. As long as the container excludes light to prevent algae growth in the nutrient solution and is able to withstand the pressure of filling it with water, everything should be fine.
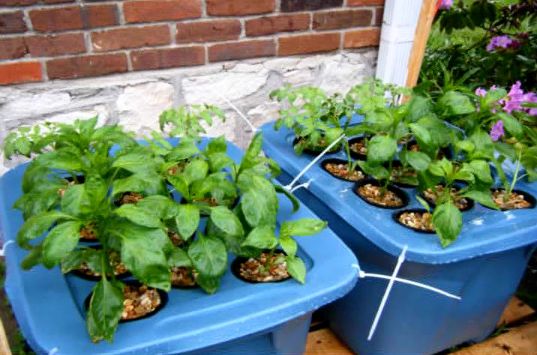
Please watch this YouTube video to give you a better idea of how to build this system… click here. Just ignore him using a storage tote tube; a sturdy bucket will work much better for the pressure of the water. His pepper plants were able to grow 5 inches in only one week. Although in the video the peppers were grown outside, you can just as easily grow peppers indoors, as well as other vegetables, as long as they are able to receive enough sunlight through a window. This will definitely help put you and your family on their way to self-sustainable living no matter where you live. Good Luck!